events

LET IT GLOW: NEON DANCE PARTY (Mambo #9)!

0-2.jpg

Nothing screams 90’s nostalgia like a glow in the dark/blacklight neon affair! When my naturally bouncing off the walls (then) 8-year-old niece wanted to have a dance party, I knew it had to have a retro feel. This party was held at a local dance studio and was a kid-modified 305 dance class…. but please believe it had me thinking about a traditionally 305-twerky dance party with my girlfriends! Either way, if you’re having your party at Mueva in Clarkston, you have to book Nicki Warner as your dance instructor, she’s the BEST!

0-5.jpg

Much of this party setup would also work for a roller skating party! Shoutout to my clever lover for Isabella’s bday tagline two years in a row “Mambo #9” (after Lou Bega’s classic, Mambo No. 5… not that you needed clarification!).

0.jpg
0-1.jpg

My favorite thing about this setup were these color-changing Illooms LED balloons from Party City! The actual balloons I listed aren’t available online (gasp), or in a multi-pack. You’ll have to go in store (big gasp) and buy them individually (I used 30x on a balloon strip @ $0.99 each), but these are a similar variety, they just don’t change color continuously. You pull a tab, air inflate, and they literally change color continuously from green to blue to purple. They were super cool and were still lit up almost a week later in my niece’s bedroom! The darker the area, the better they illuminate.

0-3.jpg

A close second were these UV/Blacklight Glow in the Dark plates, cups & utensils that worked SO well! They really illuminated under the blacklight, even in a medium dark setting. This set does NOT come with napkins though!

The disco ball stirrers were a post NYE clearance snag from a local grocery store, Kroger, but can be found here.

We set a normal folding table on top of exercise step-up risers and tucked a white table cloth under and had the girls sit on top of folded yoga blankets and a few poofs from home.

The light up crown headbands worked pretty well (only one finicky one in the batch of 12) and actually stayed on their heads while they danced.

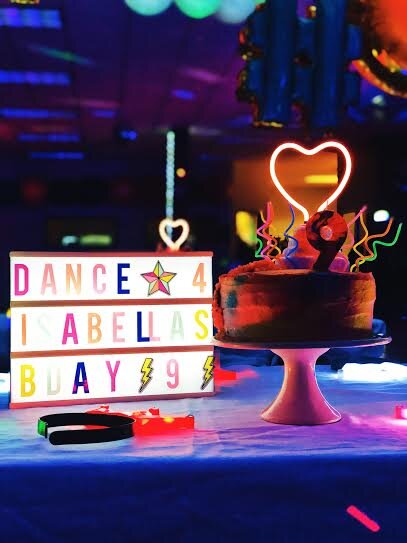
The light-up box (pictured above) was from Justice, but this BBB Lightbox would fit nicely into the theme.


0-4.jpg


Coming in in third would be the glow in the dark body paint! We did simple application on the girls faces and it showed up very well.

I also bought these glow in the dark lotus/henna tattoos, but didn’t get around to applying them. If you buy these, let me know how they worked out in the comments below!

The foil balloon numbers were spray painted with Neon Martha Stewart spray paint (my goodness do I love spray paint). I hope you recycle your jumbo balloons by deflating them with a straw because 1) it’s good for the environment, and 2) they are expensive! That “9” is actually a flipped around “P” from a previous fête! Now for the craft…

0-7.jpg

Now my absolute favorite thing about this party was this adorable heart neon sign craft! I thought about doing a variety of shapes or first initials, but just did a heart for all in the spirit of Valentine’s Day. I will be posting the full tutorial shortly!

0-9.jpg
0-8.jpg

The cake was a small but dense cookie dough + brownie/chocolate cake hybrid with orange rock candy sprinkles, buttercream frosting, and Wilton cake color mist sprays. The neon battery operated heart was from HomeGoods and bedazzled with rock candy secured with cream cheese… VERY random and scrappy, I know.. .but the niece instantly noticed this cake was a bit more…petit than others in previous years (they’re spoiled but in my further defense the cake was very rich), so I did that to give it some elevated height. You can find a similar one at Target.

Don’t forget to have your guests wear neon colored clothing so that they really light up your party!

0-6.jpg

The Makings of a Perfect Backdrop

IMG_6663.jpg

So you’ve been assigned to plan your friend’s shower. You’re making a list of essentials… cake… favors… food… decor… but possibly most of all, very gram-able photo ops! A quality backdrop has made it’s way into the forefront of party planning to guarantee those awesome Pinterest-worthy shots, while also really setting the mood for your event.

I made this backdrop last spring for a birthday dinner party, and the main course was sushi! Instead of pulling in traditional reds or golds you may typical associate with Asian decor, I decided to compliment the home’s already very white aesthetic and employed a mostly flat and satin white palette. I subtly tied in the sushi through the use of lanterns of varying sizes.

This was a very versatile backdrop and would work great for a wedding shower, or even a gender neutral baby shower. Here are some of my tips for making a great backdrop.

Mixed media - mixing textures

I am a BIG fan of mixing materials and textures to provide additional depth. Metallic fringe with tissue paper, matte and foil balloons, glitter and tulle… it’s kinda like the wild wild west of decorating. Drop those prior prejudices that certain things can’t go together (like black & navy), and make your own rules! Staying within a complimentary color palette is more important than sticking to certain materials. Here, I chose a white fringe door curtain as the base, jumbo paper flowers & tissue paper fans of varying sizes for the corners, and tissue honeycombs & poofs to contrast with the lanterns. The paper flower pack came with miniature paper flowers on strings that I cut off and peppered in between. Sourcing lanterns of various sizes and types, was important -some large, some small, some accordion style, some light up. The jumbo lanterns were placed on the floor and provided a great base, and I loved that the tiny lanterns added a bubbly whimsical feel.

whitebackdropmaterials.jpg

Set a solid foundation

Start by anchoring down your main backdrop material, whether that is fringe door curtains, tassels, drape, or whatever you choose. Be mindful of the venue’s guidelines, as some venues do not allow you to affix anything to their walls. If you encounter this, don’t fret as there are many ways around this obstacle. A PVC pipe backdrop could be an easy fix. Here, I used the windowpane adjacent to the main dining table. The white fringe curtain was secured with command strips, as the windowpane was freshly painted and we wanted to be extra careful. I loved these jumbo flat white paper flowers found in the wedding section at Party City, and used the larger flowers to frame the corners. These were taped directly to the trim of the door curtain on the top, or again with the command strips if they were going down the sides of the window pane. To hang the lanterns, I used small clear command hooks and tied them with white string.

IMG_7886.jpg

Layer it up!

Much like NYC fashion in the fall, the more layers, the better! Pile on the textures as well. For the honeycombs, I only opened them halfway and secured them on the backdrop with a flat back so they would sit more flush. In the future, I would double up the white curtain fringe for a richer look. I think it would also look great to add some tissue paper garlands or white paper chain links streaming down for more texture.

IMG_1704.jpg

Location, location, location!

Try to not place the backdrop off the beaten path of your party. Yes, you want space for those awesome group shots, but if you are putting all that time and energy into your backdrop, you want it to be enjoyed throughout the entire party, and further enhance the ambiance. If it’s a dinner party, place it near the table. If you have an elaborate dessert table, you could even place it behind that, and when everything has been served, clear that area out for group shots.

IMG_8001.jpg

Low profile flowers for the table ensured it would be easy to carry conversations. The tall candles are from the Dollar Tree and all the florals were from Trader Joe’s! For this particular party, I would have chosen a cool white vs. warm white votive for the lantern to keep that pure white look.

24B18F13-51C3-44A4-9472-7F770384D22D.JPG
IMG_7986.JPG

Materials:

White Fringe Curtain - Walmart (1 pack, recommend 2)

Accordion Lanterns - Party City (3 packs)

3D Paper Flowers - Party City (Wedding Section)

Tissue Paper Fans - Party City (4 packs of mini, 2 of larger)

Paper Fans - Walmart

Poofs - Walmart

Honeycombs - Dollar Store (non chain), also available at Target

Lanterns - Dollar Store (non chain), also available on Amazon

Command Strip & Hooks

Clear Tape

Ostrich Feather + Vintage Broach Corsages

IMG_1262.jpg

I have never been a big fan of the corsage selection at most florists. Too many baby’s breath and shiny ribbons for my likes. Last year for a daddy-daughter dance corsage order, I decided to DIY it with wax flowers, tulips, thistle and calla lilies from Trader Joe’s, accented by tulle. They turned out soo pretty, but they were pretty labor intensive, and the stems of those flowers are not as strong as your more typical rose stems, so I was slightly stressed all evening that they would snap right off. They did stay intact through the event, but this year I decided to go with something more durable that would not only make it through the night, but could even be re-worn for another special event or as a bracelet. And I know we are talking elementary school here, but after styling all 3 sisters in Milly Minis dresses (Milly’s adorable girls’ line), I also wanted to go with something more… chic.

Channeling some inspiration from the recent runways, I decided ostrich feathers & vintage broaches atop glitter slap bracelets was the way to go. The slap bracelets really hit my adult self in the nostalgia department, but what kid doesn’t love a slap bracelet?? They also ensure a perfect fit for any size wrist.

I was more than happy with the results, and most importantly, all 3 corsages were done in 15 minutes, including hot glue gun heating & drying time. These would also make for great corsages for a flower girl, homecoming, or prom!

IMG_0849.jpg

The first step is sourcing the materials. The most difficult part is finding slap bracelets that are not obnoxious colors, but I was able to find really cute pink & black glitter ones from Justice. If you’re having a hard time finding slap bracelets or want the look to feel more grown, a nice thick satin ribbon would make a great alternative. The vintage broaches were leftover from a Halloween ringleader costume, but you can easily find them at a thrift store or Salvation Army jewelry counter. The ostrich feather trim is from Amazon.

Next, open up the bracelets and lay the broach where you want to place it, and cut the feather trim to the width of the broach. For these corsages, I did not center the broaches so that the wraparound end would not be visible when worn. Though this does look slightly better on, in the future, I would just center it because it makes it easier for the kids to take on and off when they are getting in and out of their jackets or showing their friends.

IMG_0851.jpg

Slap the bracelet closed, and insert the pin through the fabric of the bracelet, and then fasten the pin closed. Depending on where the pin falls on the backing, you may need to hot glue gun a portion of the broach to stabilize it from flipping up.

IMG_0860+%281%29.jpg

Open the bracelet and lay flat, broach side down. On the inside (not glitter) side of the bracelet on the edge that will face up the wrist towards the elbow, place a line of hot glue and press the feather trim on it. Allow to cool for 5 minutes.

IMG_1265.jpg

That’s it, you’re done! Wear them with the feathers going up the arm, towards the elbow. Wear them again to jazz up some leggings and a black top, or even around a pencil holder or vase to jazz it up!

IMG_1247.JPG
IMG_1249.JPG
IMG_1264.JPG